> ## Documentation Index
> Fetch the complete documentation index at: https://unkey.com/docs/llms.txt
> Use this file to discover all available pages before exploring further.
# Roles and Permissions
> Create and manage RBAC roles and permissions in Unkey to control what each API key can access. Assign roles via dashboard, API, or SDK.
In RBAC, roles represent a collection of permissions. Each role defines a set of actions or operations that a user with that role can perform. Permissions can be associated with various resources within your application, such as endpoints, data objects, or functionality.
Common roles may include:
* `Administrator`: Has full access to all resources and functionality.
* `Editor`: Can create, read, update, and delete specific resources.
* `Viewer`: Can only view resources but cannot modify them.
## Roles
Creating, updating and deleting roles is available in the dashboard.
### Create
1. From the unkey dashboard [app.unkey.com](https://app.unkey.com).
2. Navigate to the `Authorization` section in the left sidebar.
3. Click `Create New Role`.
4. Enter a unique name for your role.
5. Enter a description for your role. (Optional)
6. Assign keys and permissions to the role. (Optional)
7. Click `Create new role`.
After the role is created, you are forwarded and can update/delete the role or connect existing permissions.
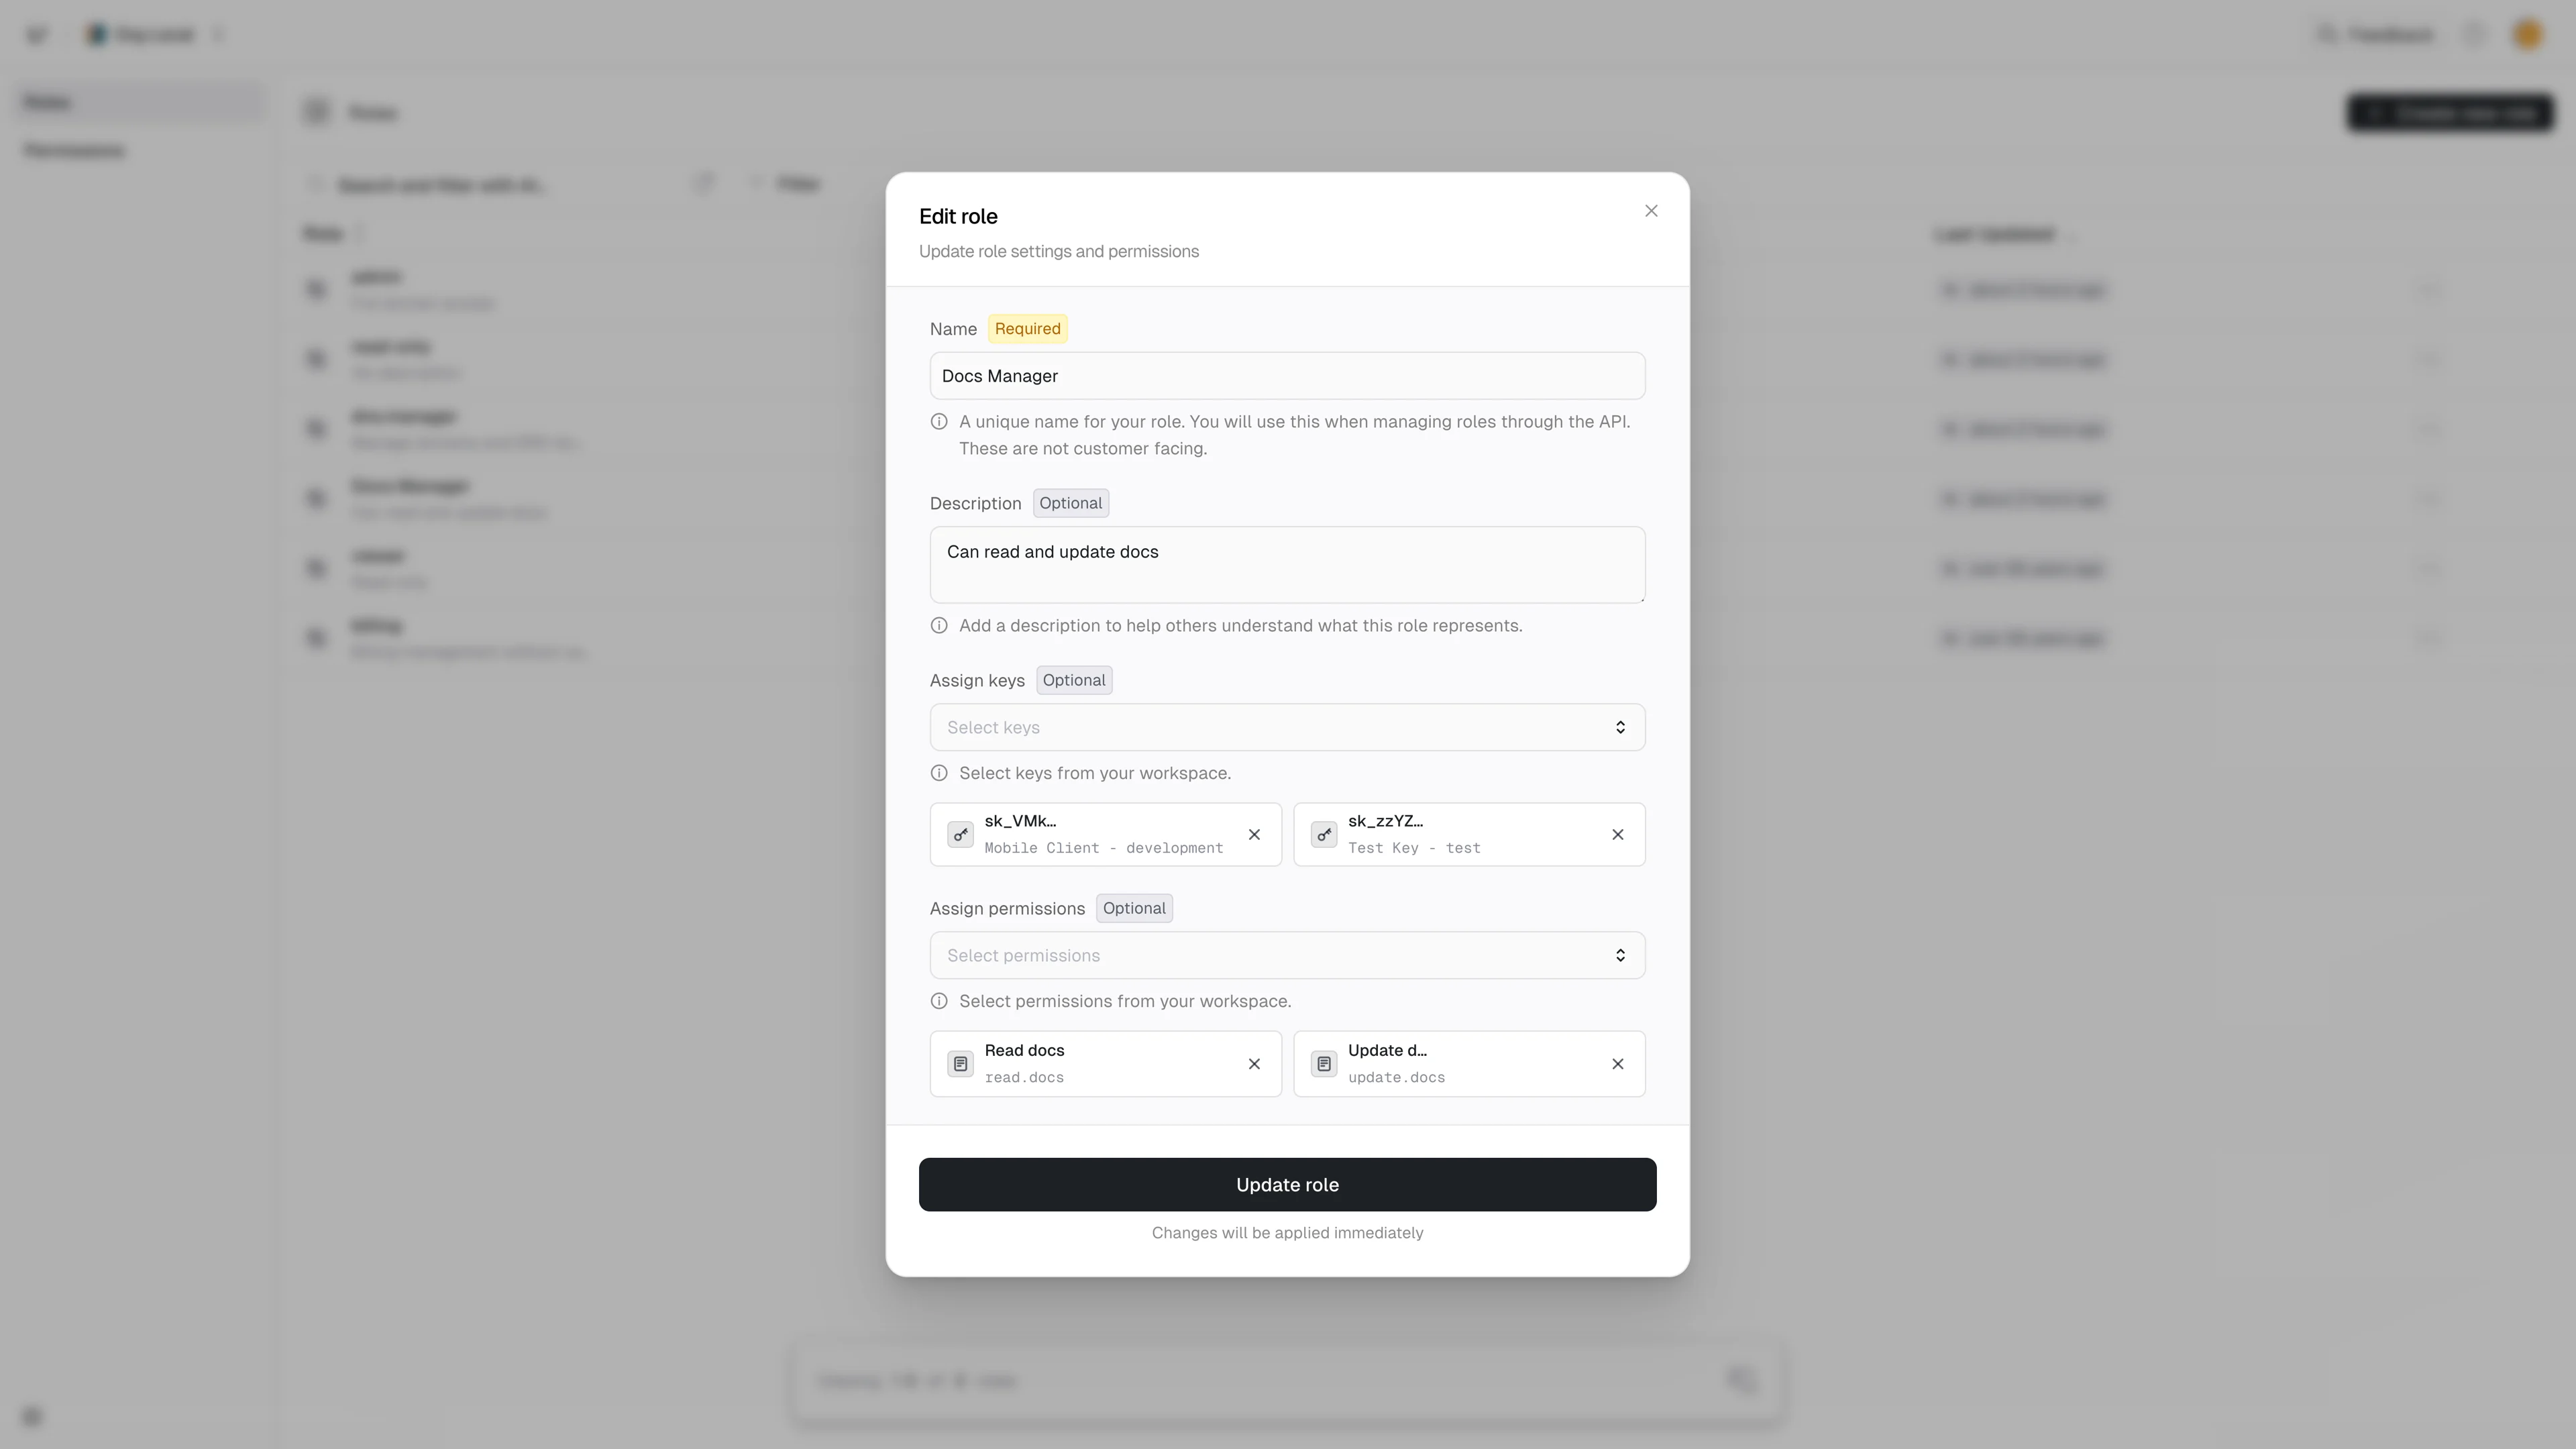
### Update
1. From the unkey dashboard [app.unkey.com](https://app.unkey.com).
2. Navigate to the `Authorization` section in the left sidebar.
3. Click on the role you want to update. Optionally you can also click the action menu (`...`) to the right of the role.
4. Make changes to the role as needed.
5. Click `Update role`.
### Delete
1. From the unkey dashboard [app.unkey.com](https://app.unkey.com).
2. Navigate to the `Authorization` section in the left sidebar.
3. Click on the action menu (`...`) to the right of the role you want to delete.
4. Click `Delete role` in the popup menu.
5. Toggle the checkbox confirming the deletion.
6. Click `Delete role` button.
## Permissions
Creating, updating and deleting permissions is available in the dashboard.
### Create
1. From the unkey dashboard [app.unkey.com](https://app.unkey.com).
2. Navigate to the `Authorization` section in the left sidebar.
3. Click on `Permissions` in the left sidebar dropdown under the `Authorization` section.
4. Click `Create New Permission`.
5. Enter a human readable name for your permission.
6. Enter a unique identifier slug.
7. Enter a description for your permission. (Optional)
8. Click `Create new permission`.
### Update
1. From the unkey dashboard [app.unkey.com](https://app.unkey.com).
2. Navigate to the `Authorization` section in the left sidebar.
3. Click on `Permissions` in the left sidebar dropdown under the `Authorization` section.
4. Click on the permission you want to update. Optionally you can also click the action menu (`...`) to the right of the permission.
5. Make changes to the name, slug, and description as needed.
6. Click `Update permission`.
### Delete
1. From the unkey dashboard [app.unkey.com](https://app.unkey.com).
2. Navigate to the `Authorization` section in the left sidebar.
3. Click on `Permissions` in the left sidebar dropdown under the `Authorization` section.
4. Click on the action menu (`...`) to the right of the permission you want to delete.
5. Click `Delete permission`.
6. Toggle the checkbox confirming the deletion.
7. Click `Delete permission` button.
## Connecting roles and permissions
After you have created at least 1 role and 1 permission, you can start associating them with each other.
1. From the unkey dashboard [app.unkey.com](https://app.unkey.com).
2. Navigate to the `Authorization` section in the left sidebar.
3. Click on the role you want to update. Optionally you can also click the action menu (`...`) to the right of the role.
4. Select the `Add permissions` input. Each item you select will be added to the selected permissions list below the input. This can be repeated to connect multiple permissions.
5. Click `Update role`.
 ## Connecting roles to keys
1. In the sidebar, click on one of your keyspaces.
2. In the sub menu, click on Keys.
## Connecting roles to keys
1. In the sidebar, click on one of your keyspaces.
2. In the sub menu, click on Keys.
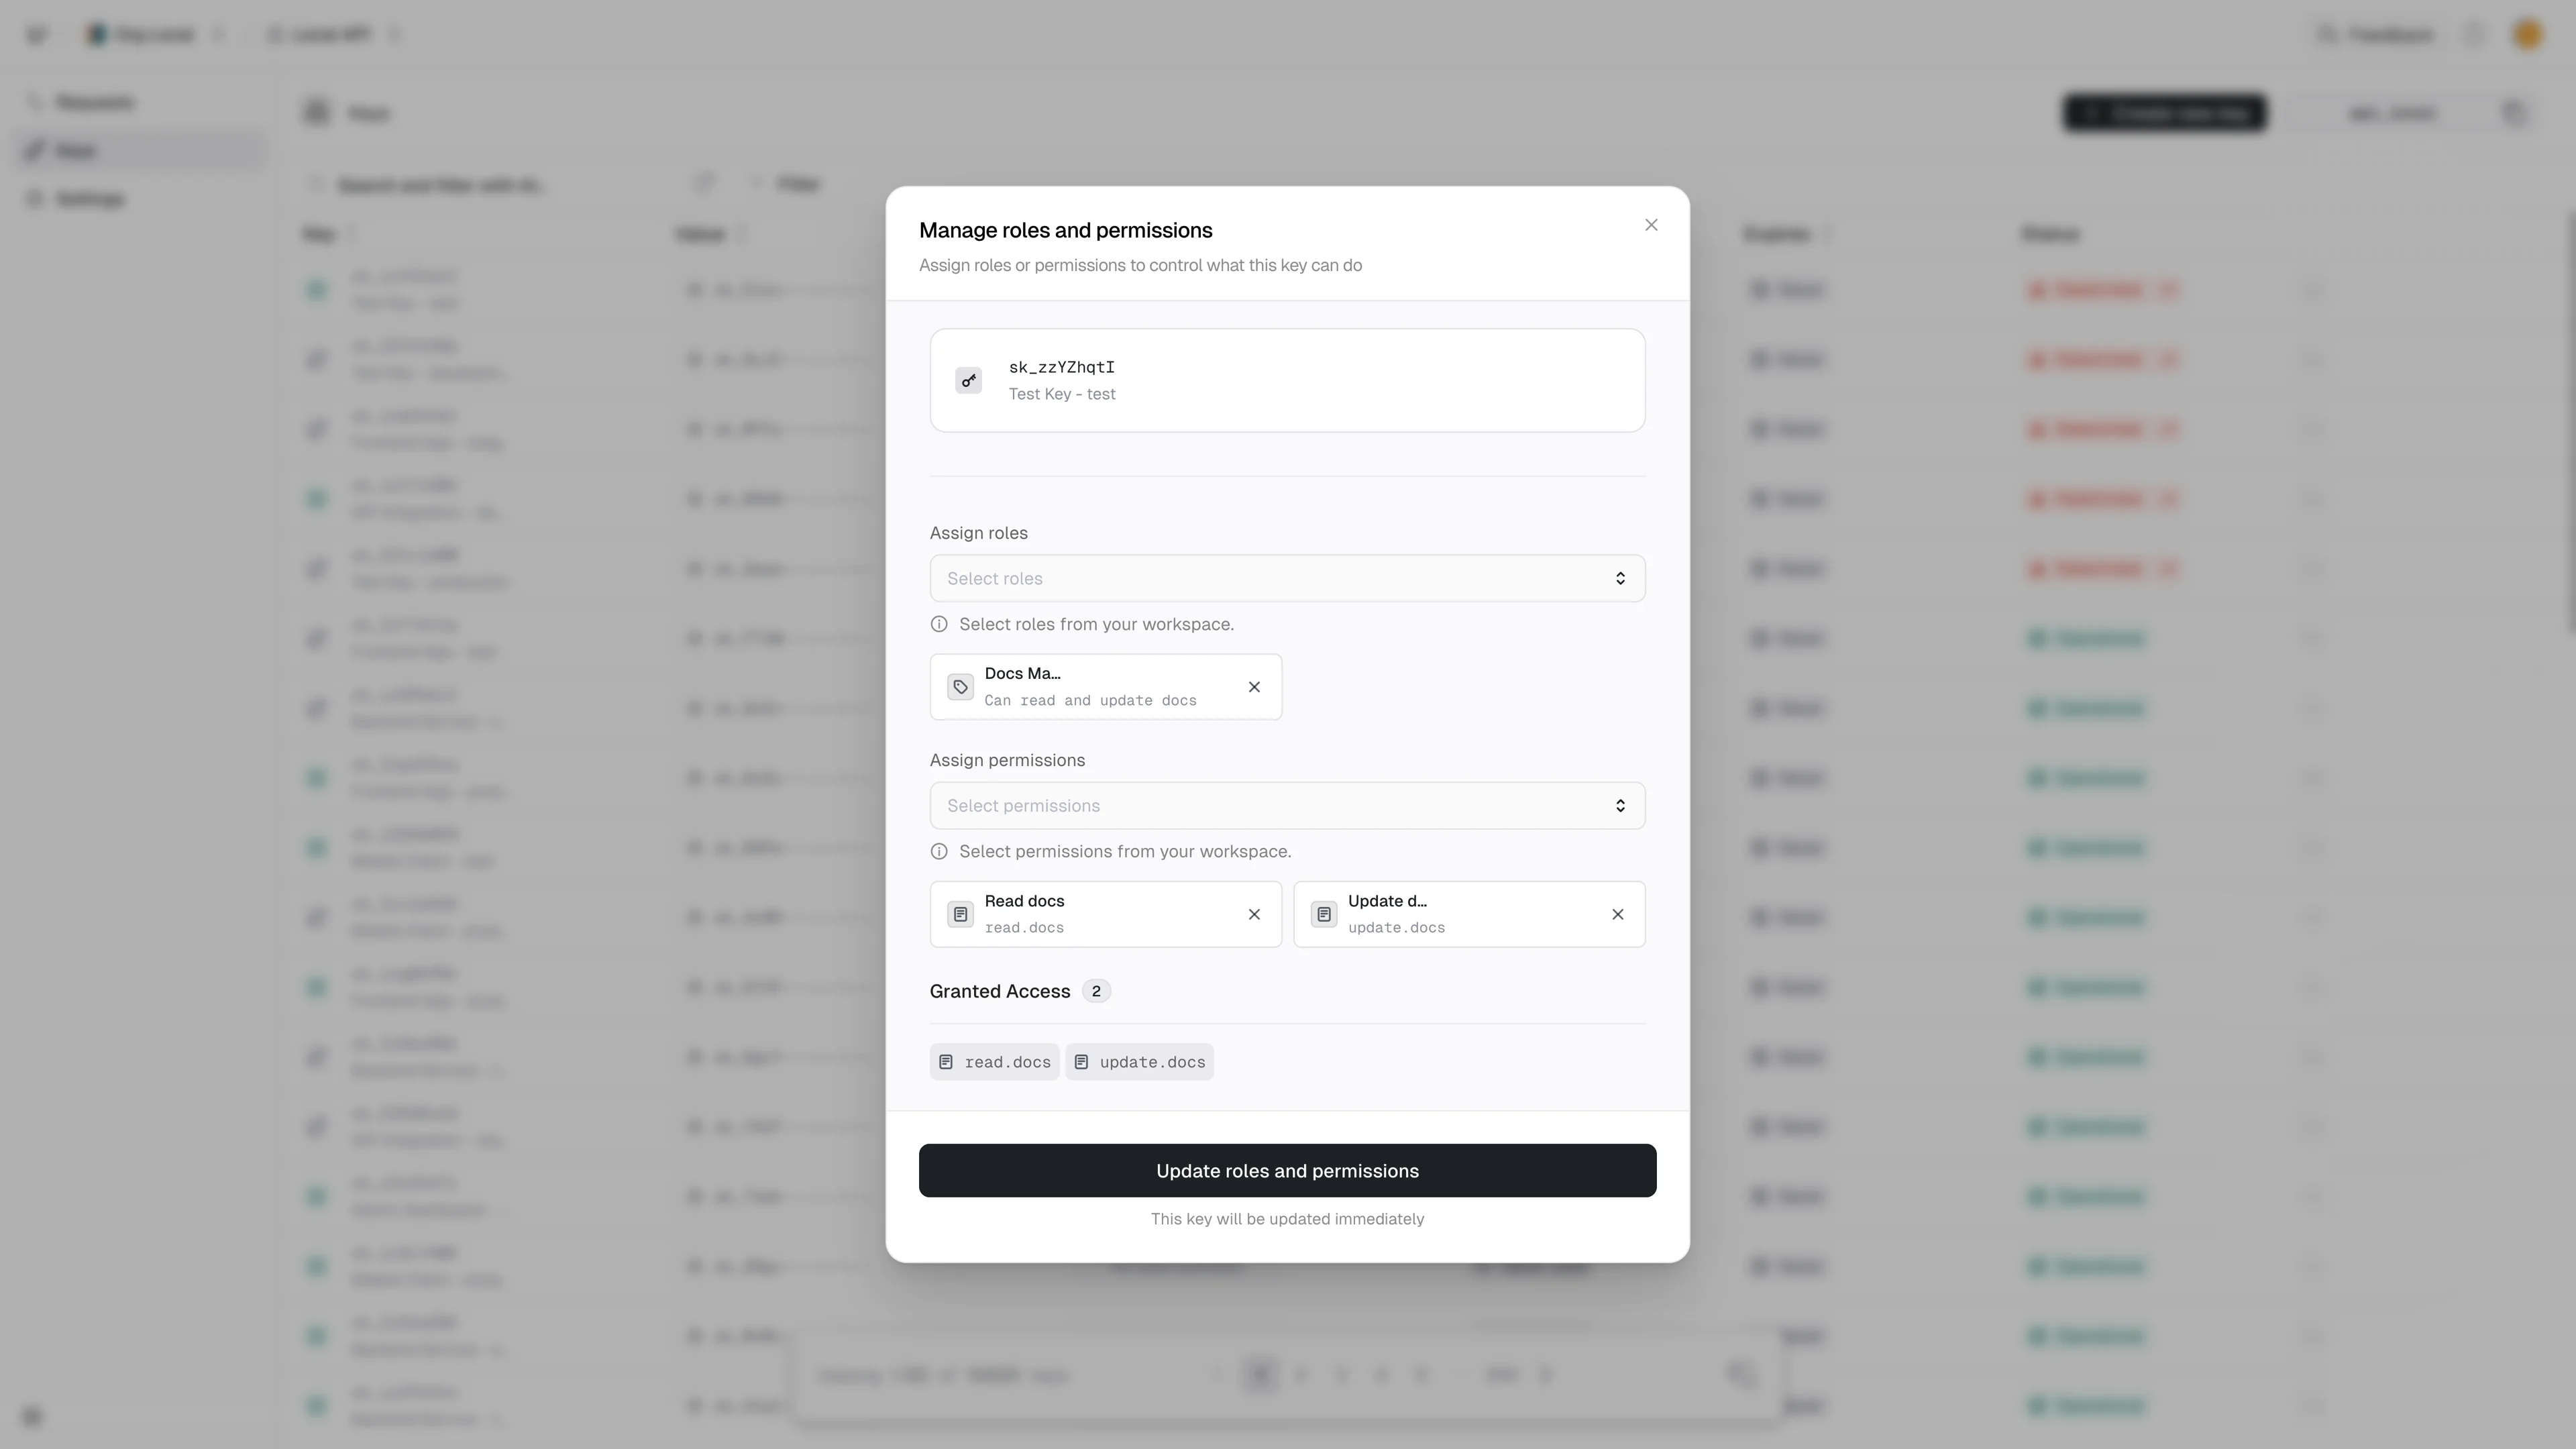
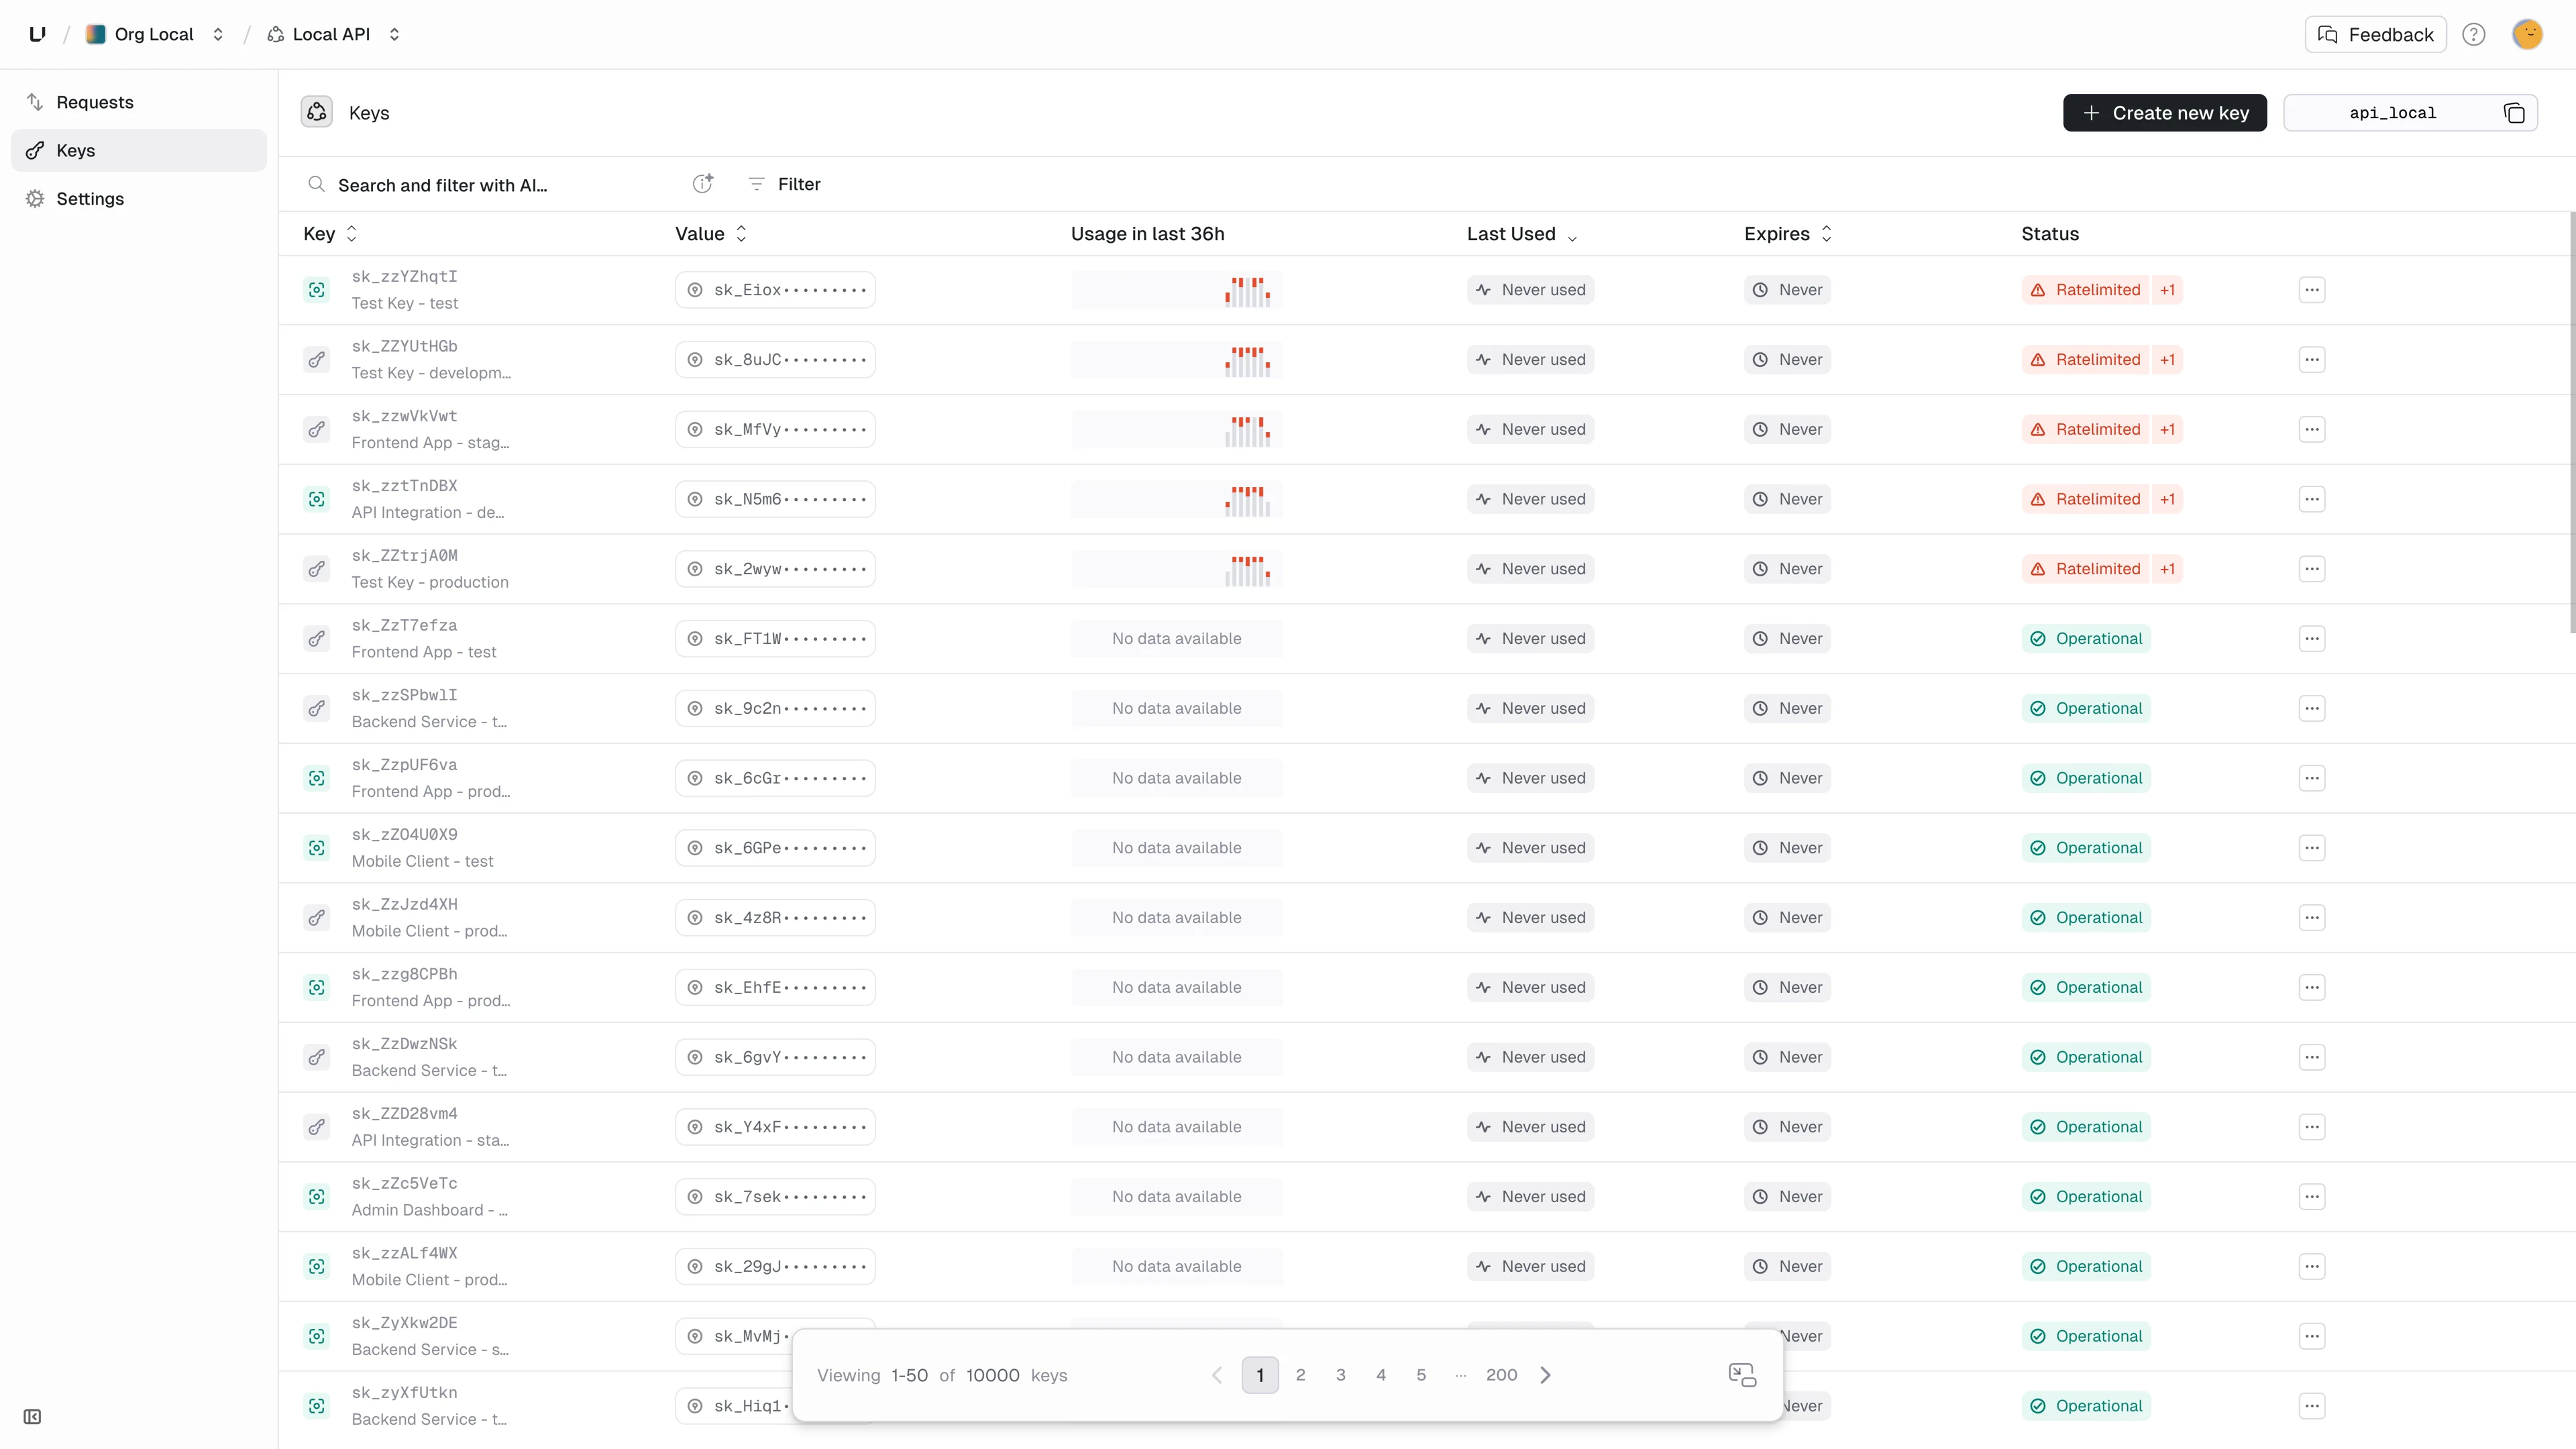 3. Select one of your existing keys by clicking the action menu (`...`) to the right of the key.
4. Select the `Manage roles and Permissions...` option.
5. Select a `role` or `permission` from appropriate input.
6. Click `Update key`.
3. Select one of your existing keys by clicking the action menu (`...`) to the right of the key.
4. Select the `Manage roles and Permissions...` option.
5. Select a `role` or `permission` from appropriate input.
6. Click `Update key`.
 ## Creating keys
When a user of your app creates a new key, you can attach zero, one or multiple previously created roles to the key.
```bash theme={"theme":"kanagawa-wave"}
curl -XPOST \
--url https://api.unkey.com/v2/keys.createKey \
-H "Authorization: Bearer ${ROOT_KEY}" \
-H "Content-Type: application/json" \
-d '{
"apiId": "${API_ID}",
"roles": [
"role1", "role2", "role3"
]
}'
```
See the [API reference](/api-reference/overview) for details.
## Creating keys
When a user of your app creates a new key, you can attach zero, one or multiple previously created roles to the key.
```bash theme={"theme":"kanagawa-wave"}
curl -XPOST \
--url https://api.unkey.com/v2/keys.createKey \
-H "Authorization: Bearer ${ROOT_KEY}" \
-H "Content-Type: application/json" \
-d '{
"apiId": "${API_ID}",
"roles": [
"role1", "role2", "role3"
]
}'
```
See the [API reference](/api-reference/overview) for details.